Friday, February 27, 2015

Frugal Friday - Homemade Cleaning Supplies

I love  making frugal homemade cleaning supplies. When you are sick or unable to get to the store it is nice to have the supplies needed to make hour own money saving cleaners.

Fortunately, I have had some freezer meals ready to go and that has saved me this week cause I have not felt well enough to cook much. Now I will have to restock my freezer meal supply. Freezer cooking is one of the best things I have ever done to keep my days under control and less stressful. I mean it. To know meals are in the freezer and I just have to pop in the oven and heat up a veggie is such a relief.

homemade cleaning supplies


You all know I love my homemade cleaners. I love how cheap they are to make but I also am sensitive to the chemicals in lots of commercial cleaning products.

I have been experimenting making my own foaming hand soap with castile soap. I no longer will buy hand soaps with triclosan in them and frankly I would like a lot less ingredients in my soaps. After checking on prices of more natural soaps, it was obvious making my own would be the most economical route. I love the simple fresh scent too. I will share soon how to make it.
*update: I do not like the film castile soap leaves on the sink so now I use this frugal homemade handsoap recipe.

I love to use my homemade alcohol and water cleaner to wipe down the bathrooms right now. I am trying to do this after hubby and I are in the bathrooms to keep from spreading the germs.

The garden is really coming along. I see tomato blossoms already but not sure they will set with cooler temps this week. We are eating lots of greens several times a week and fresh herbs for sauces and soups.

What frugal steps have you taken this week?

Wednesday, February 25, 2015

St. Patrick's Decor

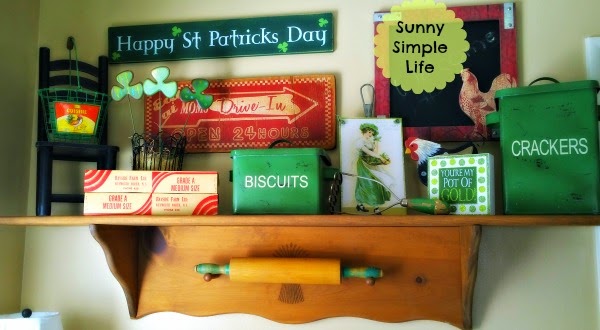
Spring is coming and that means green and in our house a little St. Patrick's Day decorating.

This year a mix of vintage green and red in the kitchen is what the hubby decided to do with our St. Patty's theme.


 He is sneaky. I just walked into the kitchen and he had put up our few pieces St. Patrick's kitsch.
I just shouted, "I love it!" across the house. He doesn't want my input but he sure likes the praise for a job well done. 


The little green basket I just picked up from Hobby Lobby and the red vintage egg carton was an amazing little find. Had to have it and it is in perfect condition.


Here is a glimpse to a past St. Patty's look.


Sunday, February 22, 2015

Rooster Decorations for Kitchen

I love to decorate with anything rooster or chicken. My family calls me the crazy chicken lady. In almost all rooms of the house you will find bits of rooster decor items. 

I have always had lots of rooster decorations for kitchen vignettes. Chickens have been in my kitchen decor since the early 90s. Now it is just a part of who I am. 


Black, white, small, large and on tea pots. Many are given as gifts.


I think you decorate with what you love and then it will never go out of style for you personally. If you decorate with the trends than you will probably be bored with it eventually. If I tire of a certain chicken it just goes tucked away and comes out maybe in another year when the mister is doing his thing. He is afterall the main decorator.


By far one of my favorite finds were these rooster canisters I picked up on a trip with friends a few years ago. They are so cheery and will never go out of style to me.


Do you have a certain them in your kitchen that you love?
Affiliate links in this post.

Friday, February 20, 2015

Sand VS. Straw Or Shavings In The Coop

There is quite the debate out there about what is the best flooring in the coop and folks ask me what is best sand vs. straw or shavings in the coop? Is sand best? What about straw or shavings in your chicken coop? Flies are attracted to rotting manure and chicken feed and there is no avoiding them. Opinions vary on raising backyard chickens and the online community is very opinionated. I will help settle the debate.

chicken coop bedding


I will share what I use in my southern California chicken coop. We are dry for the most part and our soil in the garden coop is clay so I use sand in the base of the chicken coop or the little run. Water drains quickly with sand and it dries fast without any mold or mildew. Also the chickens love to take dust baths in it. It also dries out the chicken poop very quickly and all I have to do is filter the droppings with my cat litter scoop every once in a while but honestly it breaks down fast in there with no smell.

Wednesday, February 18, 2015

Tour Of My Tiny Chicken Coop

When you raise chickens in a small urban back yard, you need to keep your coop on the small side. Our city allows for three hens per yard so a tiny chicken coop was all we needed. Here is a tour of our chicken coop and run.

Our first frugal homemade coop is still here and is behind the garage and we use it as a grow out coop. The new garden coop was ordered from Amazon. My husband said he didn't care if we got a new coop but he did not want to build this one. For our small yard this small chicken coop is perfect. We have had it for three years now and it is perfect for us.

chicken coop picture ideas, urban chicken coop, backyard chickens

It really is possible to keep chickens in a small garden. The key is not having too many and to keep it clean and attractive. A back planter was the perfect spot to place the new coop and we surrounded the perimeter with stepping stones for security.

During the day the girls are let out into the large fenced run but at night they are enclosed in the little coop which gives them a little scratching space and contains the chicken waterer and feeder. The chickens get plenty of sun in the morning and then lots of afternoon shade which is important here in southern California.

Chicken Coop Picture Ideas


simple chicken coop plans, chickens scratching

 Next to the coop is my compost bin. I am obsessed with composting and this makes it easy to just clean the coop and drop the waste right in the bin. I can also let the girls scratch and stir the compost by opening the bottom doors of the bin. I keep metal barrels that hold feed and straw for the coop bedding behind the compost bin but can be brought over for easy chores. I also use fly predators to control the flies that chickens can attract. These tiny insects you release into your garden or barn area eat the larvae of the flies before they can ever develop. I swear by these cause they actually work great and it is totally organic fly control.

You can see a small patio umbrella over the coop. I need a new one but we have had this one here for years now and it provides more shade in the summer and also keeps the main part of the coop dry when it rains and leaves a dry sandy spot below for chicken baths.

chicken coop picture ideas, urban coop ideas

The actual hen house in the coop contains two roosting bars. One that came with it and an extra one I bought. The girls have plenty of room at night and fit fine. I keep straw up here and you can see the nesting boxes tucked in at the back. Of course like most chickens, they always use the same nest box for laying eggs.

small backyard chicken coop

I hope you enjoyed our little tour of our tiny backyard chicken coop. Visit again soon.

You can find the coop we ordered here. Six years later and the coop is still working great. I have only had to clean it and restain every three years.


Tuesday, February 17, 2015

Frugal Planting Tips For Spring

This year I vowed to plant a frugal vegetable garden. I mean I always do that but a very frugal super cheap vegetable garden as in almost no money spent. I have been trying to get the garden in by only buying a few seed packets. I will share what has worked for me so far and since our spring comes early you can then use these money saving gardening tips when you get ready to start your spring garden.

Here is how to start a frugal money saving vegetable garden.
I went through my seeds and determined what I needed. I have not grown peppers from seed before so this year I needed to buy and start plants early.


 My compost is wonderful this year. Full of worms and smells dark and rich and earthy and because I throw oranges that drop from the trees in there, smells of oranges.

I decided to experiment and see if I could avoid buying potting soil and use straight compost for seed starting and in my containers. WELL, I have to tell you YOU can! It has been working wonderfully and all my seeds are germinating quickly. Below is cilantro I am growing in a pot with straight compost.


One trick you have to try is creating mini green houses over your emerging seedlings. The is the best frugal garden tip for starting your seeds. #1 it keeps the environment warmer, the soil remains damp and it provides protection from critters nibbling on your seedlings. I use old plastic fruit containers from the market. I just put them right over the top of my plants or you could plant right in the container for transplanting later.


I am using my clothes pin plant markers to keep track of what I have planted. You can see my compost is not very fine or sifted. I use it with bits of this and that in there and it has not seemed to matter. All my seeds are germinating fine. I plant seeds in anything from old six packs from the nursery to egg shells to old yogurt cups. Just make sure you have a drainage hole in the bottom.


If you grow bell peppers in containers like I do did you know you can keep them as perennials for a few years? I just trim the plant way back in winter and top dress with compost and feed with compost tea. The bell pepper below is three years old and already has blossoms forming. I also use this method with herbs. You could overwinter them in a garage or basement possibly too. I of course live in Southern California so winters are mild.


Next time I will focus on germinating seeds and what I do to give them a super start.

Friday, February 13, 2015

Saving Money on Food - Frugal Fridays

In our house one of our big expenses is food. Well, what isn't a big expense any longer?
This week I am focusing on saving money this week on food costs.


Rising food costs make it so expensive to stock your pantry and fridge doesn't it? After a stock up at Sam's Club last weekend I want to try and extend the days between shopping to save on my grocery budget. I am digging in and stretching the food we already have.

 I made my first batch of bone broth. Sam's has organic chickens now and they are very reasonable so after we ate a roast chicken for dinner I put all the bones in a crock pot and made a rich batch of healthy bone broth. I have froze it for now but I will use it to make soup this week.


Know what's in that bag? A bag I saved from the deli to boot? A couple pieces of chicken no one ate but still good. It went into the freezer to be added to my pot of soup this week. I just cannot bring myself to throw away food, especially meat.

Even the chickens benefited with some veggie lasagna for dinner. No one finished the last piece so I let the girls have it and they loved it.

Tomorrow I will make a batch of blueberry banana bread using bananas up and blueberries that are too soft. I will freeze the rest of the berries for use later.

I will be able to harvest enough greens and bok choy tomorrow for a stir fry for dinner.

We always prepare lunches at home and when we run out of cold cuts or sandwich fixins I have to get creative. One of my go to meatless lunches is wraps. I take a tortilla and fill with salad greens, mushrooms, left over grated cheese, olives and cucumbers. Whatever crunchy things you can rustle up. I then put a little salad dressing and roll it all up.

So the plan is to eat in and use up what we have and make snacks from scratch.
Please share in the comments what you did this week to save money.

Thursday, February 12, 2015

Avoid Stuck On Messes - Kitchen Quick Tip

Another tip in my kitchen quick tip series is avoiding stuck on messes on the bottoms of my pans and bake ware is vital to my happiness. I do not have patience to stand and scrub any longer than I have to. Here is how I prevent stuck on gunk from the bottom of my baking dishes. This is perfect if you are roasting a chicken.


The answer is foil. Now the frugal part of me does not like to waste foil but the stronger urge in me to avoid unnecessary time scrubbing and ruining my hands scraping baked on crud off the bottom of my pans, wins out.

Whenever I am roasting or baking something I know will be a greasy stuck on mess, I line my pan with foil, the dull side up. Get the foil all up the sides because the point is to avoid any of the juices and liquids from touching the pan. Give the foil a shot of nonstick spray and you are good to go.

Now when it comes time to clean up, I just toss the foil and rinse the dish out. Easy as can be now that you have avoided the baked on build up that takes forever to scrub off. If you missed my last kitchen quick tip you should check it out.

Wednesday, February 11, 2015

Raising Puppies

Most of you know we have two new rescue puppies named Luna and Tug. Luna because a six year old named her and Tug because well, let's just say someone likes to pull on things and carry something around all the time.


We are now 16 weeks old and doing great. We keep our owners very busy with lots of outside play time but we spend our indoor time cuddled in our bed in the service porch where we can be watched by our mom.


Cuddling is a big part of our day and the tall man in the house sneaks us into his bed to watch TV at night. Don't tell mom cause she doesn't let us sleep there all night.


We play outside and try and keep our mom from her gardening chores when we get a chance. She does not appreciate us running through her garden beds though we are not sure why. The dirt in there is far superior than the rest of the yard.


Mom says our puppy playpen is a life saver. She loves the Northstar playgate and says it is the only way to raise puppies. We spend a lot of time in the sunshine playing in here so she can get things done.

A few have asked where we bought our gate and we have had it for years. It is from Amazon and we bought it for our six year old and then have used it for chickens and now puppies. Couldn't be happier with it and you can use all or just a few of the panels.

Tuesday, February 10, 2015

Super Simple Mexican Meatball Soup

This is a wonderful soup you make using leftover Spanish rice and meatballs from your freezer. For nights when you don't have much time to prepare dinner, this satisfying easy soup recipe will help you put dinner on the table in minutes.

The seasonings in the Spanish rice and the salt in the chicken broth are enough seasoning for me but go ahead and add pepper or some hot sauce to spice the soup to your liking. Great leftover rice soup recipe.


Mexican Meatball Soup

Recipe by Elaine Lewis @ sunnysimplelife.com
Ingredients
  • 1/2 cup each chopped onion, celery, carrots
  • 2 cups leftover Spanish rice
  • 8 cups chicken broth
  • 1 lb frozen meatballs
  • 1 cup chopped cilantro
Cooking Directions
  1. Saute onion, celery and carrots in a little bit of oil. Add chicken broth and meatballs. Simmer until veggies are tender. Add rice and heat thoroughly. Garnish with cilantro when serving. This soup freezes well.

Monday, February 9, 2015

Ultimate Banana Bread


The most requested decadent ultimate banana bread recipe in the house. The girls request this version of moist banana bread the most. Our version of what we call the ultimate banana bread.
What makes it ULTIMATE is all the extras you throw in there. Chewy, dense and moist with lots of crunchy additions.


Ultimate Chocolate Chip Banana Bread

Recipe by Elaine Lewis @ sunnysimplelife.com
Ingredients
  • 3 ripe bananas
  • 1 cup sugar
  • 1 1/2 cups flour
  • 3/4 tsp teaspoon salt
  • 1 teaspoon baking soda
  • 1/4 cup oil
  • 2 egg yolks
  • 1/2 cup shredded coconut
  • 3/4 cup chocolate chips
  • 1/2 cup chopped macadamia nuts
Cooking Directions
  1. Mash bananas first and mix in yolks in large bowl or with mixer. Add remaining ingredients into same bowl. Mix well. Fold in nuts, coconut and chips. Bake in a greased loaf pan or two small loaf pans at 350 degrees for one hour checking with a toothpick to come out clean. If you use the smaller loaf pans start checking for doneness at 45 minutes.
I like to bake in two smaller loaf pans so I can freeze one but mostly because I like to have my banana bread done all the way through without the edges getting burned or too done.

Sunday, February 8, 2015

Clothespin Plant Markers

There are so many plant marker ideas but I am all about easy and frugal gardening tips. You don't need to buy fancy plant markers from Home Depot or Lowes. Head to the dollar stores or your laundry room for these frugal DIY clothespin plant markers.

frugal gardening, DIY easy plant marker

Supplies needed:
Wood clothespins
Sharpie marker
And that's it!!

Just abbreviate if needed and write your plant description on one side and the planting date on the other side and done! What could be easier?


seed planting

You can place your cheap plant markers on the sides of pots, seed starting  containers, plastic plant packs and like me right on the fencing or trellis.


So there you have it. The easiest frugal plant marker homemade tool.

Sharing at these blog parties.

Friday, February 6, 2015

Best Month To Buy Furniture - Friday Frugal Update

Did you know February is the best month of the year to buy furniture? Furniture stores are getting ready to debut their new styles in spring so this is their last month to push their older inventory.


We are currently shopping for a new bed. This is long overdue but a necessity. It is time as they say. To save money ,and frankly space ,we are going from a king to a queen. I know you may think us crazy but we used to have a queen and we were fine. To gain some space in our smallish bedroom, we will go back to a queen sized mattress.  And a plus is they are cheaper than a king.

The weather has been warm during the day so we have not had to run our heater. Our gas bill had doubled in December when we ran the heat more so I am thrilled to know this will cut way back on our next bill.

The vegetable garden is almost all in. I have been mixing my compost with a couple bags of bought compost to rebuild the soil. I am also mulching with the coop chopped straw bedding when I clean it out. I do not do this around anything we will be eating soon as I do not want any contamination. I use aged compost for food crops. Mulching will help keep water costs down.

I am only harvesting bok choy and other greens right now but hope to be planting some early experiments of our more summer vegetables soon. They are all in pots right now. We are so warm here anymore that I am going to see if some early planting yields some earlier harvests.

I pulled up a couple runner shoots of our blackberries and will start another bush with them along some existing fencing.

What have you done this week to save money? I love to read other folks frugal pursuits.

How To Examine Your Chickens

How to Examine Your Chickens

As chicken keepers, you know that keeping your birds healthy is your primary duty. The majority of the time this will just be a case of checking them every day to make sure they all look active, happy and aren’t showing any signs of discomfort.

As with any animal, once you have cared for them for a while you will soon get used to their behavour and how they look, so an unhappy or ill chicken will be easy to spot.
There are daily checks you can carry out to make sure you have a happy flock, and you can also carry out weekly physical checks to ensure they’re showing no signs of illness. This page will guide you through the sorts of things you need to be looking out for.
When checking your flock you should be able to determine what a healthy bird looks like as well as having the knowledge to spot the signs of illness:

A HEALTHY BIRD SHOULD:

  • Be alert
  • Stand upright with no problems
  • Be active and mobile
  • Wattles and combs should be bright red in colour
  • Eyes and beak should be clean
  • Feathers should look glossy
  • Be eating and drinking
  • Generally look content

SIGNS OF ILLNESS:

Chickens can be good at hiding their illness, as in many cases you’ll notice a chicken looking unwell, huddled up with their feathers ruffled up but as soon as you disturb them they will stand upright and scurry away. In these circumstances you need to stand still for a while, let the chickens get used to your presence and you’ll soon be able to spot any poorly chickens – they will fluff up their feathers again, their eyes will close, their wings will droop and they just tend to look very sorry for themselves.
In this instance, you need to investigate further, physically checking your bird for more signs of illness. These checks are sometimes referred to as the ‘comb to toe’ check. It’s recommended that you carry out these checks on a weekly basis so any health problems can be picked up and dealt with immediately, therefore enhancing the health and happiness of your chickens and maximizing their life span and their productivity.

THE COMB TO TOE CHECK:

Starting at the comb you work your way along the chicken’s body searching for any unusual signs.

THE COMB:

As mentioned above, a healthy chicken should have a bright red comb. If you notice black spots on the comb, this could indicate signs of frostbite in the colder months or, during the warmer months, could be a sign of fowl pox.
A purple comb can indicate quite serious health problems; it could warn you of a respiratory problem and the colour could be due to the lack of oxygen reaching the bird’s extremities. It can also be the symptom of a stroke or heart attack, and in these cases your bird should be checked over by a vet immediately.

EYES:

Ideally your chicken should have bright, clear eyes. If they’re watery or cloudy this could be a sign of conjunctivitis. Watery eyes combined with sneezing and coughing could mean your bird has a respiratory illness. Swollen eyes where pus is visible can also be signs of eye worm.

THE CROP:

The crop of a chicken is situated at the bottom of the neck and it’s where they collect food to be ground down before being pushed down to the stomach. Usually this will be empty in the morning and fill up over the course of the day, slowly deflating as the food moves down towards the stomach. If the crop feels solid and full of food this could mean they have an impacted crop whilst a crop that’s full of fluid could indicate sour crop, both of which need to be treated straight away.

THE KEEL:

This is the bone that runs down the center of the bird and is a brilliant indicator of an underweight chicken. The keel should be well protected with a fair amount of flesh on either side. A protruding bone can be an indicator of health problems; this is an important check to make as a good set of feathers easily hides a thin frame.

THE ABDOMEN

A hen’s abdomen should be fairly round and soft; if it’s hard this could mean there is a problem with egg laying whilst it being soft and full of fluid could indicate that there is fluid in the abdominal cavity.

THE VENT

The vent is another word for a hen’s bottom; a healthy vent of a laying hen should be pink and moist, so if it’s a paler colour this means she is not in lay. When checking the vent you should also look out for visible signs of parasites.

LEGS:

Legs should be smooth and generally brightly colored, with the exception of those breeds with dark colored legs. Any flaky skin can be a sign of scaly leg mites and should be treated as such.

FEET:

If your chicken is limping then this needs to be investigated straight away. The main things to look out for are swollen or warm foot pads, as this may mean there is a splinter or something trapped in the foot pad. Black spots on the underside of the foot can indicate an infection or bumblefoot, something that can be fatal and must be treated as soon as possible.
Carrying out these physical checks not only gives you peace of mind and improves your flock’s welfare but also means that, should you spot any problems, you can visit the vet armed with information to help them diagnose and treat the problem quickly.

Thursday, February 5, 2015

Potting Bench Ideas

This time of year I am in the garden daily. I rush through my chores indoors or ignore them all together and head out to garden to plant seeds, fill pots and tinker in the soil. Planning, plotting the promise of fresh garden produce.

I am dreaming of a real potting bench with sink attached. Not the small ugly plastic one I currently have but one that I can gaze upon and enjoy. Decorated for the seasons and attractive enough to photograph and share. But mostly, it needs to function because I am a gardener and like to have things where I can find them and handy at hand. 

I have ideas in my head and hope hubby is on board for I have potting bench plans.
My mother in law has said I could have her lovely teak potting bench. When?


This potting bench is a great upcycle and with all the old furniture in our garage this is a great idea for a potting bench with storage for all your tools and seeds.


An indoor potting bench is great if you have a garden shed. Keeps everything out of the elements and if you live where weather is bad you can still get in there and garden while it is raining outdoors.


What a great dual purpose potting bench you can use for serving at outdoor parties.


But seriously look at THIS POTTING BENCH! This spoke to me, no it screamed at me. Elaine you must have a potting bench with this farmhouse flair. I adore everything in this picture down to the chicken feed sign. This will for sure go on my Pinterest potting bench board.

I already have the galvanized cans and old rusty garden tools hanging up out back. It is my therapy to play in the soil, my true garden healing.

all photos courtesy of  bhg.com

Wednesday, February 4, 2015

Coffee Tips, Recipes and More

If there is a close second to my love of chickens then it must be coffee and I have a few coffee tips, recipes and more. I blog a lot about my love of coffee. I think I am addicted. Here are some of my favorites in all things coffee.

Remember when everyone was setting up a coffee bar? Well, I knew I had to have a cute defined space for mine. It has moved a few times but in my kitchen it had to be a small compact coffee bar with color of course and by that I mean RED so our coffee meets bagel time would be cuter. Don't tell hubby.

small coffee bar, vintage kitchen

Hard water deposits and even bacteria can gather in your coffee makers so regular cleaning is essential. I show how I use nontoxic household kitchen items to  clean you coffee maker or Keurig.

how to clean your coffee maker, coffee sign


We are too cheap to visit Coffee Bean and Tea Leaf (my favorite) or Starbucks very often so I love to find ways to fancy up our coffee time at home. Some favorite ways to dress up those coffee beans:

how to make coffee foam

Simple DIY coffee foam takes just a minute and you already have the tools in your kitchen. I promise.

Or how about our frugal version of white chocolate peppermint mocha latte.

homemade peppermint mocha

And though this recipe has no coffee in it whatsoever, I think coffee creamer ties it in. These are a Saturday morning favorite of caramel macchiato pancakes.

caramel macchiato pancakes

I believe the only recipe I am missing is a coffee cake recipe. I better get on that.

These are our favorite coffee pods and I love that they come in a little mesh bag and not a plastic cup. They come out to only .31 per cup if you have them on subscribe and save like we do. We get a case a month. If you do subscribe and save it is actually $41.65 per month.


Monday, February 2, 2015

Garden Gnome Village

The Gnomes that live in our garden have been busy sprucing their gnome garden village. Christmas brought a few new additions and even a new resident garden gnome.

Our weather has been spring like so the gnomes are working hard preparing their gardens for spring.


Of all the gnome statues I love this guy the most. He welcomes you to the village.


We finally found the perfect fairy door for the gnomes. I had a hard time finding one to fit the pot turned house. It fits perfectly.


I see some tracks in the moss so our garden gnomes are busy bees doing chores and pulling weeds. I hope we do not see another visit from the skunk that wreaked havoc in here last year.
Garden pests are always in the garden these days. I believe it is the prolonged drought. 


There are so many fairy garden supplies out there these days that the possibilities are endless. We have used a lot of what we already had on hand to create our gnome village.


Below is a door very similar to ours. I found mine on Amazon. The gnomes have been collected over the years mainly as gifts for my hubby as this is his little project.


You can find more of our gnome garden in this video: